To understand how to tune a Scalextric car, we need to start with the basics…
In this post we’ll look at the parts of a typical Scalextric model, both outside and inside. I’ll be using a Scalextric Ford Mustang GT4 as a test-bed to tweak, tune and develop. You can find all ten blog posts here: https://blog.jadlamracingmodels.com/tag/scalextric-tuning/. After each step, I’ll be running the Mustang for two minutes on my test track, a Scalextric Sport SL6 layout with an ARC Air power base. That way, we can see if the work done on the car has improved the lap times and the handling, before moving on to the next step. There’s another blog post here with details of the SL6 test track and ARC app set up.
Along the way, I will explain any jargon, specialist part names and technical terms as best as I can. The labelled diagrams in this first post will be a useful reference.
So let’s get started with our look at the Scalextric Mustang GT4…
Dimensions & Outside Components
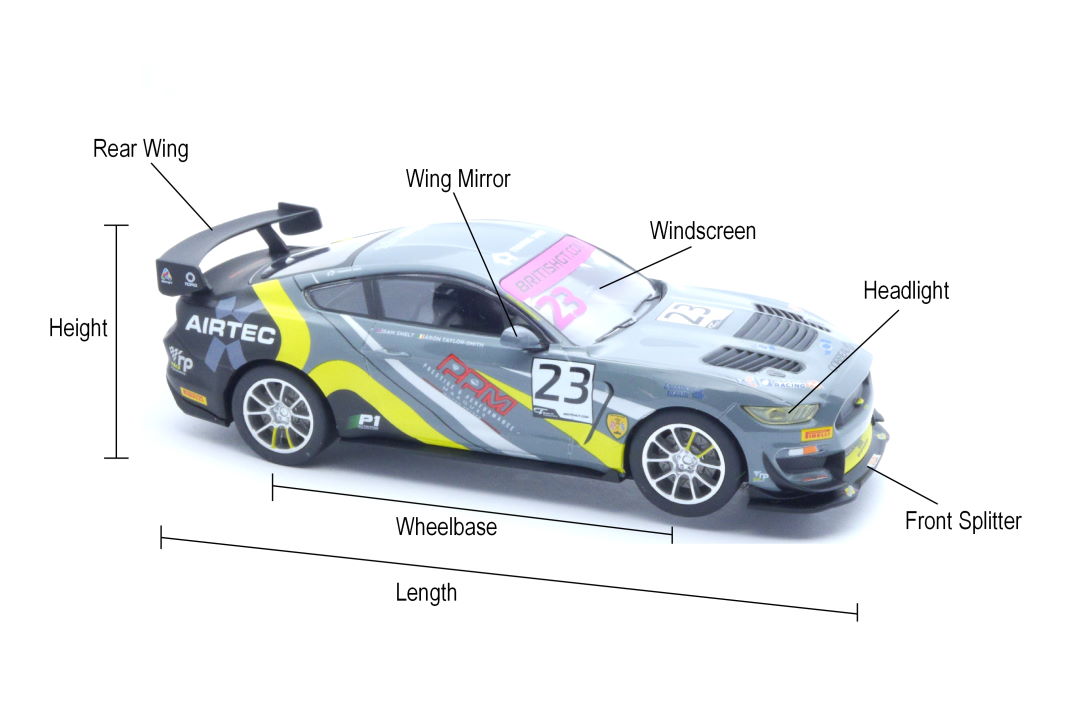
There are four physical measurements that are important to consider when choosing and tuning a race car: Length, Height, Wheelbase and Rear Axle Width. In later posts I’ll add weight and magnetic downforce measurements to that list. In all my slot car reviews I include those six pieces of data. Each has an impact on how the car will handle on the track.
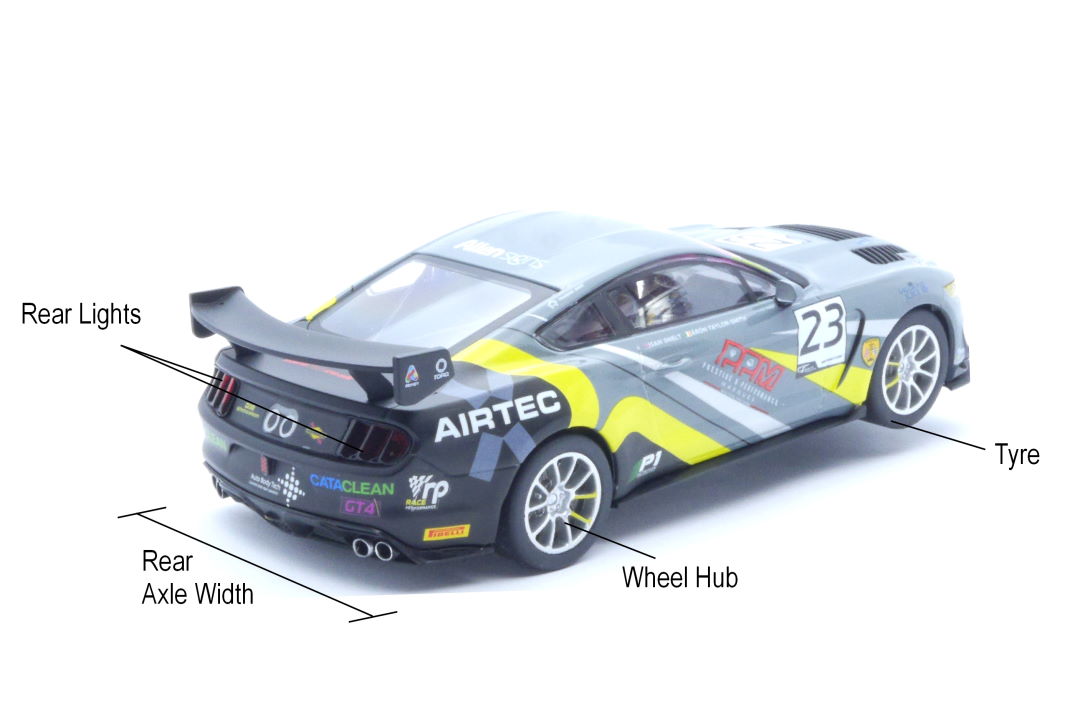
The outside components are common to most Scalextric “high detail” cars: a Rear Wing, Wing Mirrors, working Headlights and Rear Lights, plus a transparent Windscreen and windows showing the cockpit interior and driver. Many of the Scalextric cars that come in sets – as well as some “Super Resistant” and “START” models – don’t have working lights and the windscreen and windows are either blacked-out or are painted on.
What we’d normally refer to as just “wheels”, I have separated into their two components: a plastic Wheel Hub and the rubber Tyre that goes on it. That distinction will be important. I’ve also labelled the Front Splitter – the lowest point at the front of the car. This can be part of the underpan (as on the Mustang) or part of the body. It’s something we’ll need to keep an eye on.
Underneath The Car
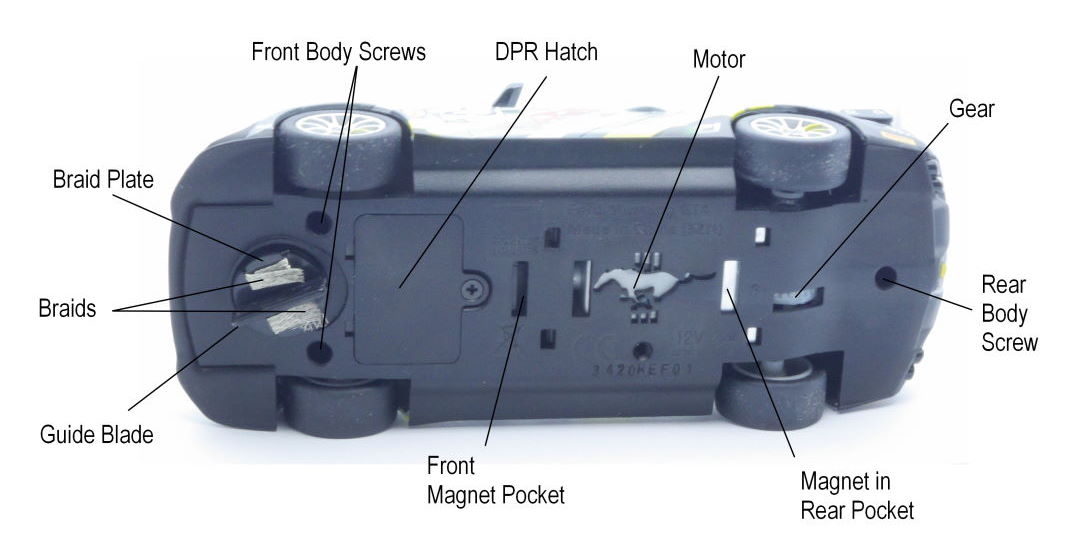
Underneath the Scalextric Mustang GT4 we see the underpan or “chassis” and its various components. The Mustang horse logo over the motor is purely decorative – these cut-outs are a nice new feature on Scalextric cars.
At the front are the guide and braids. The plastic Guide Blade sits in the slot on the Scalextric track and ‘guides’ the car round the circuit. Sitting on the guide blade is the Braid Plate: this holds the steel braids in place and connects them to a pair of metal contacts underneath. The Braids pick up electricity from the rails on the track to give power to the car. As we’ll see, getting the guide blade deep in the slot improves handling – and getting the best possible connectivity between the track, braids and metal contacts gives us reliable and smooth power to the motor.
Behind the guide is the DPR hatch. Any Scalextric Digital Plug Ready (DPR) car can be easily converted to digital by replacing this hatch with a C8515 Digital Plug (C8516 for F1 DPR cars). A small cross-head screw holds the hatch in place.
Through various holes in the underpan, we can see the Motor, the Magnet (with an alternative Front Magnet Pocket) and the Gear. The magnet is attracted to the metal rails on the Scalextric track and gives what we call ‘magnetic downforce’. This helps the car grip the track and go faster through the corners. Adjusting this downforce can dramatically change the handling of the car.
Like most recent Scalextric cars, the Mustang has three screws holding the body to the underpan – two Front Body Screws and one Rear Body Screw. These can be removed using a small cross-head screwdriver to reveal the components inside the car. If you don’t have a suitable screwdriver, this little set is ideal: www.jadlamracingmodels.com/gaugemaster-model-railway-screwdriver-set-gm695/
A First Look Inside
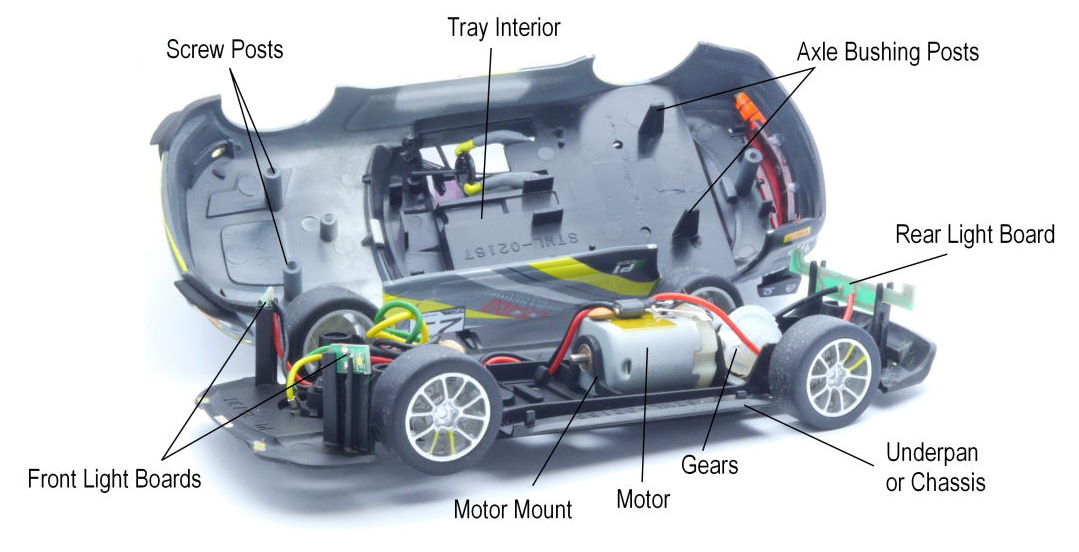
This first look inside the Mustang shows the underneath of the body, with a flat Tray Interior, the three body Screw Posts and two Axle Bushing Posts to the rear that sit on top of the rear axle bushing to prevent the rear axle getting dislodged in a crash.
On the Underpan – or Chassis – we see the Motor held in a raised part of the underpan: what we’ll call the Motor Mount. The motor in the Mustang is the standard “short can” version. Some cars are fitted with a “slim can” motor – usually Formula One, Legends F1 and some of the smaller Classic cars, like the Escort, Cortina, VW Beetle and Mini Cooper S. For those who need to know, the short can is a Mabuchi FC130 “endbell-drive” motor rated at 18,000 rpm at 12 volts and 100gcm torque. The slim can is a Mabuchi FF-050 rated at 18,000 rpm and 150gcm torque. The slim can motor is more powerful (8.3 watts, compared to 5.3 watts), which gives cars fitted with the different motors quite different characteristics. The two motors are not interchangeable, as they are a different shape and size.
Whatever the type, the motor drives the rear axle via the Gears. In the Mustang – and most recent Scalextric cars – the motor and gears are “in-line”, where the motor sits length-ways and the gear is in the centre of the axle. Many older Scalextric cars have the motor and gears in a “sidewinder” set-up, where the motor sits sideways across the car, next to the rear axle. In this case, the small pinion gear on the motor drives a big crown gear just next to the left hand rear wheel. The standard gear ratio for inline cars is 9:27 (nine teeth on the pinion and 27 teeth on the crown gear). The standard sidewinder ratio is 11:36. A few cars – such as the Classic Mini Cooper S – have different gear ratios.
We also see the location of the Front Light Boards and Rear Light Board – which are fitted with LED lights and resistors to lower the voltage. The Mustang is unusual in having a separate board for each of the two headlights – it has been more usual to have a single board across the front of the car. I prefer the arrangement in the Mustang as the front becomes less crowded.
The Electrical & Mechanical Stuff
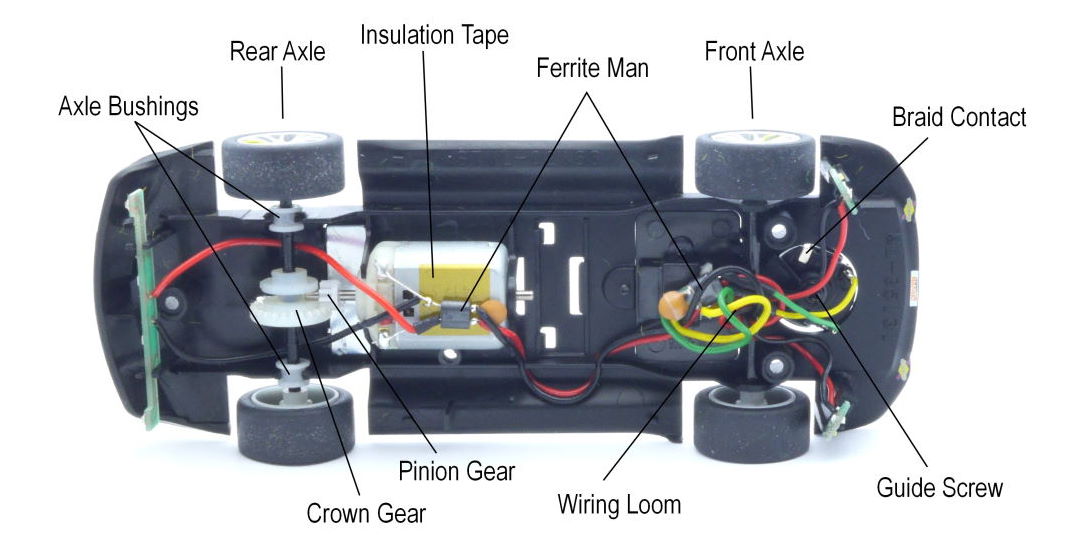
This layout is very typical of most late-2010s and early-2020s Scalextric cars. At the front, you can see the guide is attached to the underpan by a small cross-head Guide Screw. There is also the glint of one of the two shiny metal Braid Contacts that fit into the base of the main guide assembly.
Next, you can see the spaghetti which is the Scalextric Wiring Loom. The yellow and green wires connect the braid contacts to a plug that fits into a socket on the DPR hatch (or the C8515 digital chip). The power is then distributed via black and red wires to the front headlight boards and to the motor. The rear light board is fed by wires from the motor.
Part of the wiring system is what we call the Ferrite Man. There are usually two of these in a Scalextric car – one on the yellow and green wires from the braids and another across the motor terminals. The name comes from the orange disc of the ceramic capacitor looking like a ‘head’ and its wire ‘legs’ passing through a grey ferrite bead that looks like a ‘body’. The incoming wires attached just above the ferrite bead can look like ‘arms’. The function of the ferrite man is to act as a filter for electromagnetic interference created by the braids and the motor. This interference can seriously disrupt the working of a Scalextric digital car, so the filters are fitted as standard to all Scalextric models.
The Insulation Tape on the motor is also vital on digital cars – if the wires of the ferrite man touch the metal motor casing, a short-circuit will cause a digital chip to burn up. Even on a standard non-digital car, a short-circuit can cause the power base to go into safety mode. Don’t remove the insulation tape.
Apart from the electrics, the diagram shows the important mechanical components – axles, gears and bushings. The Front Axle simply sits in raised hoops, giving a little up-and-down movement. The Rear Axle is held in the underpan via white plastic Axle Bushings. These keep the axle firmly in place, while also giving the axle a smooth surface to rotate in. This axle-bushing surface is lubricated at the factory. Keeping this smooth is important for performance – any friction means power from the motor is be used to create heat rather than speed on the track.
The same is true of the gears. A smooth “mesh” between the small Pinion Gear on the motor shaft and the bigger Crown Gear on the axle means less friction and more power to the rear wheels – and less heat in the motor. The gears are lubricated at factory and the mesh is usually nice and smooth – but it is something to look at on a first inspection.
That first inspection – when we first get a new car out of the box – is how we will start the second part of this Scalextric tuning series. We’ll be getting the Mustang on the SL6 test track and looking at four really easy tweaks to improve the handling and lower the lap times.


According to a very knowledgeable slot car enthusiast. The slim can motor isn’t a regular 18k motor.
This video disputes that claim https://youtu.be/qX9_nPu8RVs
I very much doubt that this is a case of only one motor not being the stated RPM
Thanks for your comment Martin. In this basic introduction, I have used the usual shorthand that if a manufacturer calls their motor 18,000 rpm, then that’s what I use too. As you say, there is always variation – and often quite large variation. The ‘Slot Car News Motor List’ (Google it) is a fabulous piece of research and worth looking at. One of many things I learned from that article is that the rpm is not always the most important feature of a motor, but how quickly a motor gets there – roughly indicated by the overall power figure. As I touched on in my blog post, the Scalextric FF motor is more powerful than the more common Scalextric Mabuchi short-can. That can make it more of a handful – especially running without magnets or on a wood & copper-tape track. In that situation, you’d absolutely want to change the motor to a less powerful one. I will be looking at a couple non-magnet set-ups at the end of this tuning series, but most of the blog posts are focused on standard Scalextric cars, running with magnets on a Scalextric Sport home track – which is how most Scalextric cars are used.
Is it okay if I link your post on Twitter? It’s really imformative!
Of course…