
So you want to spend some money looking for that ‘unfair advantage’?
Tuning the Scalextric Mustang GT4 has – so far – been all about getting the most out of the standard components. I’ve not used a single upgrade part. I think this is the best way to understand how a Scalextric car works, to develop new skills and learn how to problem-solve issues. Every increase in performance – small or large – is down to pure graft, not deep pockets.
Of course – if you want to spend money – there are shortcuts to going faster. However, to be able to use upgrade parts successfully, it still helps to have a solid grounding in the basic tuning techniques. See it as an apprenticeship…
You can find the full Scalextric Tuning series here: https://blog.jadlamracingmodels.com/tag/scalextric-tuning/
In this blog post I will look at some of the tune-up parts available on the Jadlam website that can be used with a standard Scalextric car. I’ll be improving our test car and creating a second car – a monster of a Mustang!

Slot.it and NSR performance parts
Over the past twenty years, Slot.it and NSR have been at the forefront of creating high-performance slot cars for home and club racing. Both companies started by producing tune-up parts for racers – and many of their parts will fit into a Scalextric car. Having said that, the Slot.it and NSR components are specifically designed to work in a performance slot car – throwing powerful motors or super-sticky tyres at a Scalextric model won’t necessarily make it faster round a lap. Instead, carefully selecting – and then testing – tune-up parts can make a big difference…
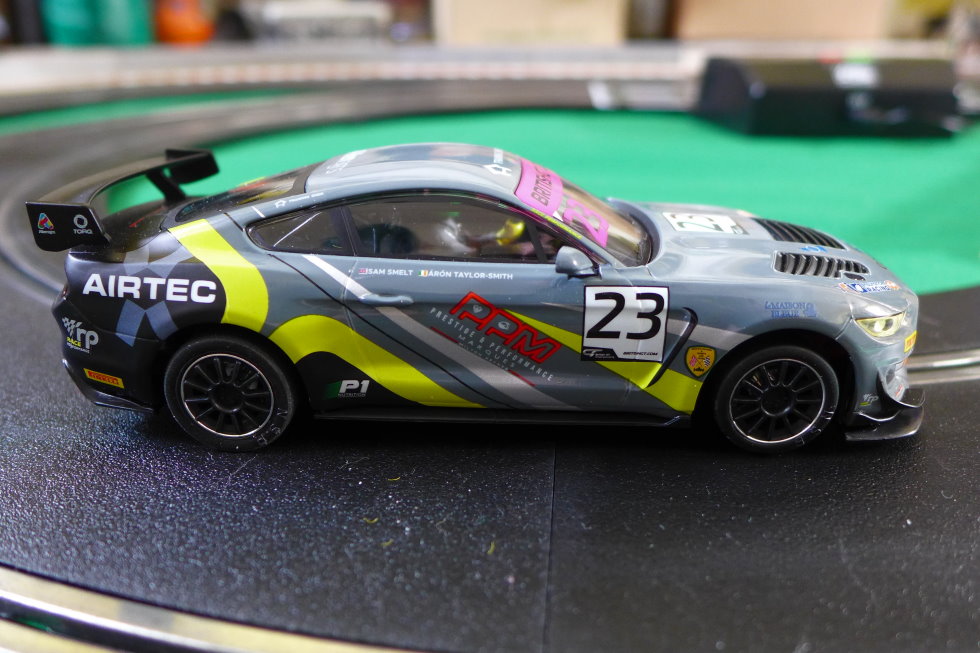
Upgrading Our Mustang GT4 Project Car
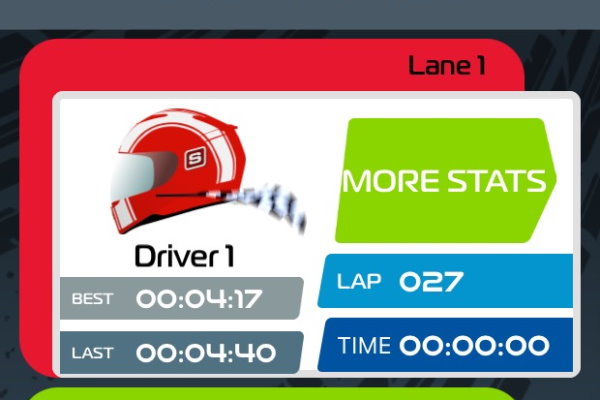
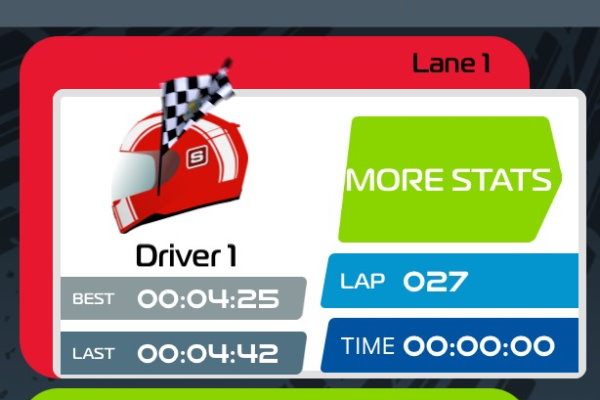
First of all, I need to set a benchmark time. The Mustang is as it was at the end of Part 7 – Body Float – a well-tuned machine with standard parts – plus a fresh scuffing of the rear tyres. A two minute run on my Jadlam SL6 test track gave an impressive 27 laps and a best time of 4:17 seconds – we do have a pretty good car now. Can we improve it? I’m going to start with a couple of small changes…
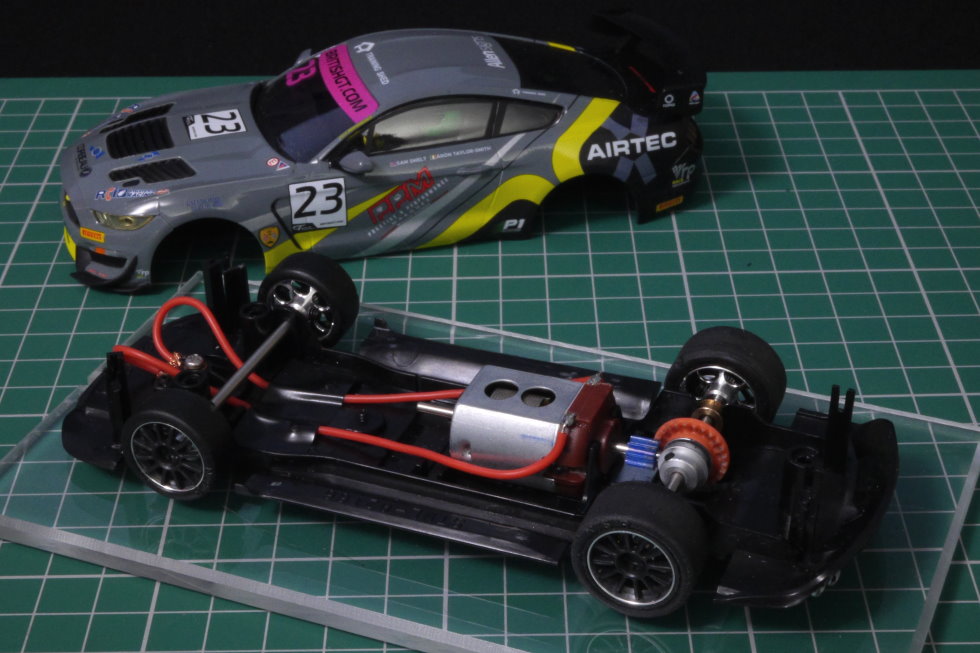
1. Better Screws
One easy way to improve body float is to use a screw that has no thread under the head. This allows the screw to move more freely without it being so loose it risks falling out. Losing screws is something that has happened quite often to the Mustang in these tests – and that can cause a short circuit or power overload if the screw falls into the slot. I’ve replaced the standard screws with Slot.it SICH53 Metric screws, but the CH51 version is a few millimetres longer and will be a better choice on some cars… The important thing is to use a ‘small head’ metric screw – the large head versions won’t fit in the Scalextric underpan.

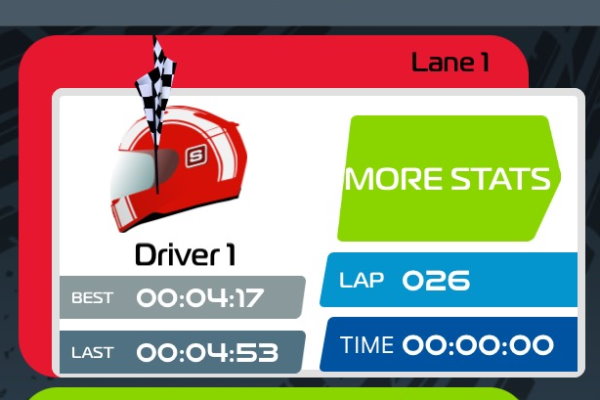
The new screws certainly give a better ‘rattle’ and more front-to-back movement. However, during a couple of warm-up laps, the car didn’t feel quite right. The rear of the body was very loose, so I tighten that screw to give more normal body float – and the behaviour of the car on track improved. I guess that goes to show how even small changes need to be tested and tweaked – and that’s a reason why I’ve changed only one thing at a time during this Tuning series. A two-minute timed test run gave 26 laps and 4:17 seconds. No difference, but no risk of the screws falling out!
2. Racing braid
Using a thinner, softer braid helps keep the front of the car stable and using copper braid gives better conductivity. Many slot racers use NSR Ultra Soft Braid. This is available in 1 metre rolls for you to cut to the length you need – or in ready-cut packs of ten (enough for five cars). There’s also a choice of bare copper braid or tin plated. The plated braid is more rigid and harder wearing. The bare copper is softer, but needs more regular tweaking.
Although the NSR braid is the racer’s choice, it might not be ideal for you – especially if you race on digital layouts. It needs more care and attention and can also get damaged on lane changers and crossover pieces – any strands that break off are likely to cause a short circuit / power overload on a digital or ARC powerbase. A more robust alternative is the Slot.it SISP19 Competition braid, which is a little thicker.

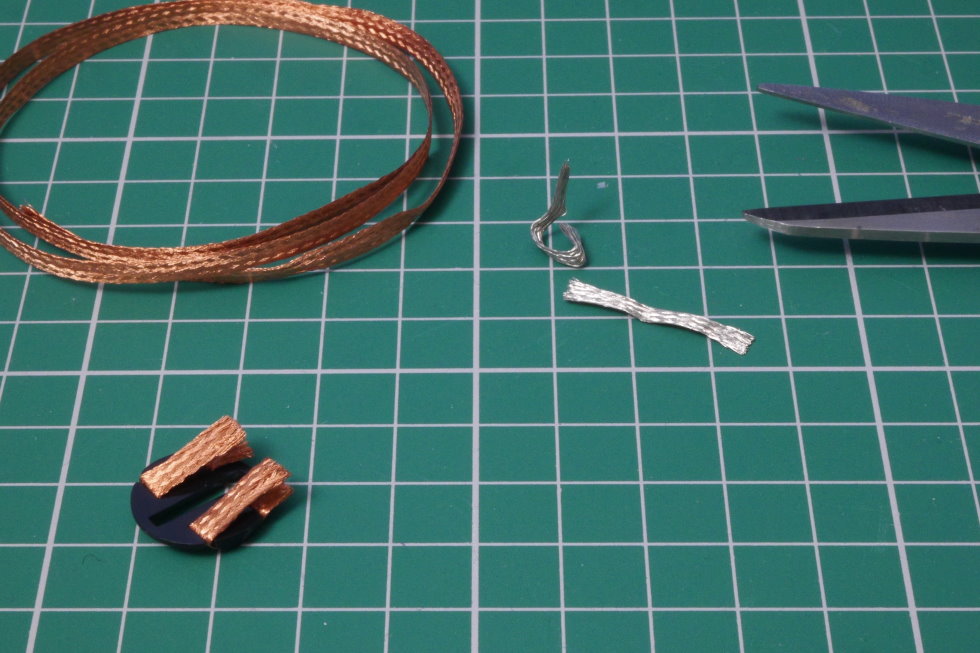
Cutting and fitting braid to the Scalextric Easy Change guide requires a bit of practice. Make sure you use a pair of sharp, heavy-duty scissors to cut the braid cleanly. First, remove the original braids, measure the length and cut a length of racing braid about 2-3mm longer. Insert the new braid into the slot at the back of the braid plate, lining up the trailing edge with the rear of the plate. Then wrap the longer end down, forward, up and back. Repeat with the other side. Finally, insert the braid plate on the guide – back first and then the front. Make sure the plate sits exactly over the guide plate underneath. If it isn’t, you won’t get full power from the track.

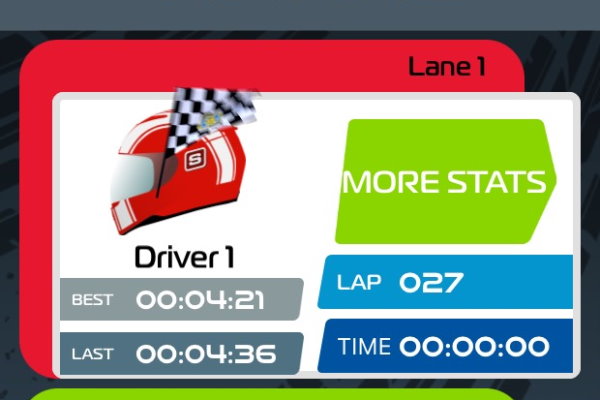
With NSR Ultra Soft copper braid fitted, how did our Mustang get on? The new braid did need some laps to bed in, but I felt it gave a smoother and more responsive drive. A 2-minute run gave us 27 laps and a 4:25 second best lap. The Mustang hasn’t tended to understeer, so I’m not surprised the new braid didn’t give any big improvement. I did like how the Mustang drove with the NSR braids, so I’ll keep them on the car.
3. Front Tyres
Reducing front grip and getting the tyres to only just touch the track is crucial to tackling understeer – as we saw in Part 6 – Fixing Understeer. This isn’t a problem for the Mustang – the front is set up nicely and all we did was to true the front wheels and tyres and then add a coating of nail varnish to reduce the grip.
If the wheels are lifting the front of the car, it is possible to fit low-profile zero-grip tyres – both NSR and Slot.it make them. However, the front wheels of the Mustang are big and wide – and none of the zero grip tyres I had in my spares box would fit. Looking at the dimensions, the Slot.it SIPT15 zero grip tyres are probably wide enough. These might be a good choice for Scalextric GT cars. I use the SIPT19 tyres on the narrower BTCC front wheels – these tyres are low profile, zero grip and work very well.
4. Rear Tyres
Rear grip has always been a big issue with the Mustang. With careful truing and softening the rubber with some oil, I have achieved a decent balance of grip and handling with the tyres that came with the car. However, I want to see if simply fitting some Slot.it or NSR tyres would have been an effective shortcut.
Performance slot car tyres come in various compounds and sizes. Getting the right compound for a specific track surface can be a tricky process. If you’re racing at a club, ask what other people are using. Most of the Scalextric GT and BTCC cars first released after 2016 have wheels that are the same size and profile as the ‘European standard’ hubs made by Slot.it and NSR. This means that tyres from those brands will fit the Scalextric hubs perfectly. For these cars, I like the Slot.it P6 compound tyres for racing on Scalextric Sport track – although I’m starting to experiment with the new NSR ‘RTR’ (ready to race) tyres. The benefit of both compounds is that they need very little preparation – you can slip them on the wheels and off you go.
For the Mustang, I’ll run a tyre test with a pair of Slot.it SIPT24 P6 compound GT tyres and some bright red NSR 5260 RTR GT tyres. The NSR tyres are also available in black here.

I ran the Slot.it P6 tyres first. These are slightly narrower (9mm vs 10mm) and lower profile (21mm vs 22mm) compared to the Scalextric tyres. On the test track, the car felt much ‘tighter’ – in that the rear didn’t step out as much. But when it did, the car broke away and I couldn’t save it. That meant I was reducing my corner-entry speed in some places. As we saw when I softened the Scalextric tyres with oil, more grip can make a car trickier to drive – especially one with a high centre of gravity like the Mustang. We solved that in Part 5 – Fixing Oversteer by adding some weight to the underpan to lower the CoG. In a 2-minute run, the Slot.it P6-shod Mustang covered 27 laps and set a best time of 4:21 seconds. Not bad…
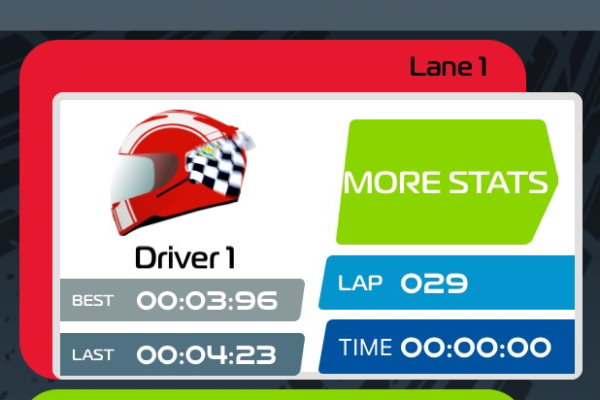
With the red NSR RTR tyres fitted, the car was sensational. The NSR tyres are the same width (10mm) and lower profile (20.2 vs 22mm) compared to the Scalextric tyres. What made the NSR tyres so good was the extra grip combined with a more predictable sliding behaviour when I passed the limit of adhesion. Of course, the lower profile tyre will get the magnet closer to the track rails and give more magnetic downforce, but I’m pretty sure that wasn’t the whole story. A 2-minute run gave 29 laps and a best lap of 3.96 seconds. And it was a much more predictable drive than with the Slot.its. As an off-the-shelf replacement, these NSR RTR tyres definitely get my recommendation. That’s a first sub-4 second time for the Mustang and a record 29 laps in two minutes. Awesome!
I’ll leave the project car there for now – with the NSR rear tyres, braid and Slot.it screws. Those will stay on the car for the next step in Part 9 – Removing the Magnet. However, we’ll now go off on a bit of a tangent – a quick look at other upgrade parts, fitted in a completely new chassis…
Building The Monster Mustang
There’s no time for a blow-by-blow walk-through of how I built this second car. Essentially, I stripped out all the components from the chassis – apart from the traction magnet and the flat bit of the DPR hatch. I then built up the car with performance parts – some from my parts box and some borrowed from an NSR Audi GT car.
From back to front…
- Rear axle: NSR8401 49mm axle
- Rear wheels: NSR5004 17 x 8mm ‘Air System’ aluminium wheels + plastic inserts
- Rear tyres: NSR5230 20x11mm ‘Supergrip’
- Axle bearings: Bronze Low Friction – equivalent to Slot.it SIPA68
- Motor: Slot.it MX16 – 23,000 rpm and 170 gcm torque at 12v
- Gears: 9-tooth pinion and 25-tooth crown gear – equivalent to NSR6701 gear set
- Wire: flexible silicone – equivalent to Slot.it SISP22B
- Front axle: NSR8401 49mm axle + NSR4815 2mm brass axle spacers
- Front wheels: NSR5003 17 x 8mm standard aluminium wheels + plastic inserts
- Front tyres: NSR5226 18 x 8mm ‘No Friction’
- Guide: Slot.it CH10 universal screw mount guide + NSR4819 Pick-up spacers
- Braid: Slot.it SISP19 Competition braid
- Body Screws: Slot.it SICH53 small head Metric screws.
So how did it go? Well… it was certainly a monster! Not wonderfully refined though… Of course, I went against my own advice that underpins this Tuning series by throwing all the parts together and not testing each one individually to see what improves the car and what doesn’t. I ended up with a car that was too powerful and rather top-heavy for the twisty little SL6 test track. I added about 12g of weight into the underpan and that settled it down. On a larger track, the MX16 motor would have space to express itself, but not so much on the SL6…
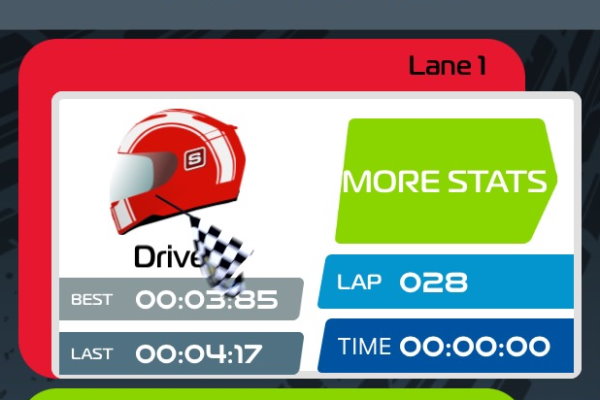
It took a while to learn how to drive the Monster Mustang effectively, but I finally committed to a timed run and put in 28 laps and a best time of 3:85 seconds. The car was eleven hundredths of a second faster over a lap than the final magnet version of our project car – but it was a challenge to drive on the SL6 track.
Had I bought all those parts separately – in addition to the cost of the Scalextric Mustang – I would have spend much more than buying an NSR GT3 model. And I’m still left with a less than perfect chassis… the NSR and Slot.it cars are designed to get the best out of these high-performance parts, a Scalextric model isn’t. But how much faster would an NSR GT3 car get round the SL6 track?
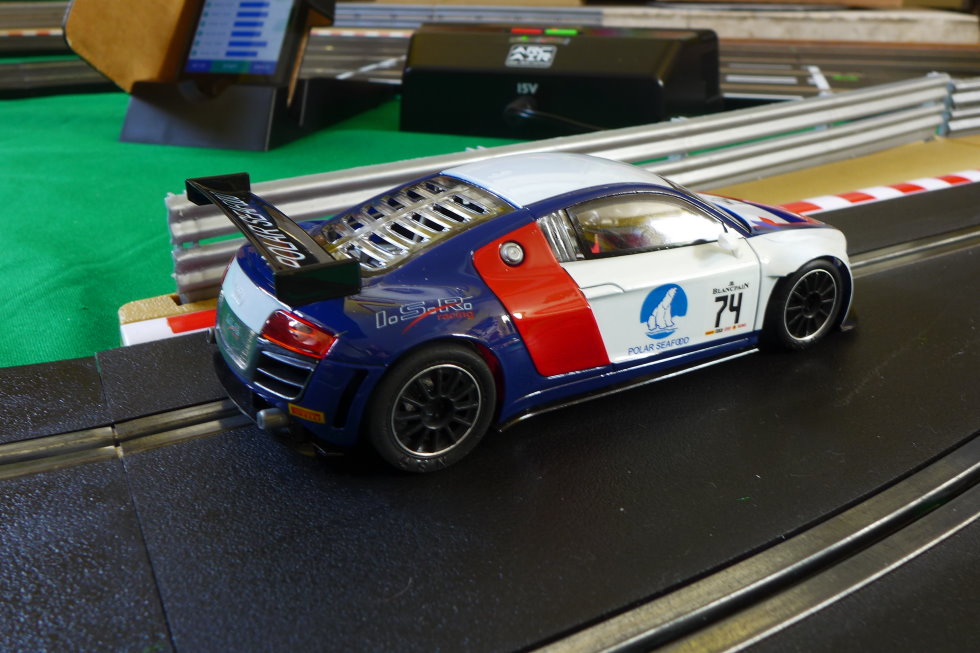
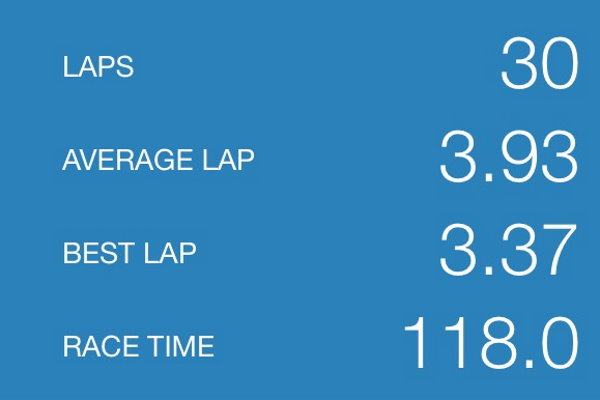
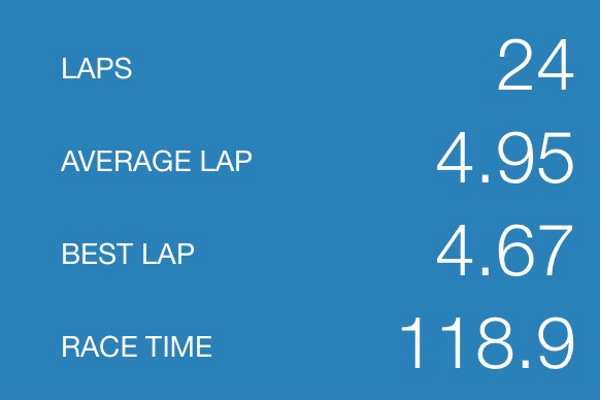
Moving the wheels back onto my bog-standard NSR Audi R8 (like this one), I fairly effortlessly banged in 30 laps and a fast lap of 3:37 seconds. That was with the NSR magnet fitted and timed with LapTracker (the white NSR guide doesn’t count laps with ARC powerbases – a swap to a Slot.it guide is the best fix). With the magnet removed, I managed 24 laps and a best of 4:67 seconds – which is right up there with the Scalextric magnet cars and an impressive non-magnet benchmark to carry over to next time.
Hmm… if you want a super-quick performance slot car, I suggest you buy one – don’t spend too much of your money throwing tune-up parts at a Scalextric model. After all, a carefully-tuned Scalextric car can be pretty quick and great fun to drive with just the parts it comes with.
I hope you enjoyed this look at upgrade parts. If you’re tempted to hop-up a Scalextric car, it certainly is fun – although a pack of those NSR RTR tyres looks the best value upgrade, followed by the bronze axle bearings… If you want to smash your lap record, then take a look at performance cars like the NSR Audi R8 used in this post – and do have a read of my introduction to Slot.it and NSR performance cars. Next time, we go non-magnet racing with the Mustang.